Zaph|Audio - SB Acoustics 2-Way : Baffle Layout Design
Baffle Layout Design
There are 2 ways to design the front baffle layout. You can select it by pure aesthetics, within the limits of the front baffle dimensions possible that allow for the correct box size. Acceptable response is certainly possible using this approach. The other option is to select it using the resultant acoustic response profile. The latter is often thought primarily to take the driver center-to-center (CTC) distance into account at the crossover point. Optimum response, at least within a given listening window, requires more than this.
There are other issues in driver placement on a baffle. We'll keep this in the context of box systems and direct drivers. Dipoles and horn/waveguide systems have different requirements. Theissues for this design are diffraction effects and methods to deal with them.
While it is certainly possible to have a great system with vertically in-line and centered drivers, there will be anomolies, referred to as diffraction, that might be further improved with careful placement and more so with additional diffraction control methods. Since there is little to no cost in this approach, let's look at what we may do in that area.
Driver Placement and Baffle Edge Diffraction
There are generally two sources of diffraction, the baffle edge and adjacent drivers. The latter will be addressed at another stage. We'll start off by examining the response of a typical in-line and horizontally centered placement. This is used most often in commercial products and probably also in DIY systems. The aesthetics of this are often preferred, but as in other products, items with the best aesthetics are not necessarily the best performers. To complicate this, however, we can't look at just one location in space (listening or design point).
Diffraction is related to not only the geometry of the baffle and its edges, but also to the relative distance of driver to edge to listener. That is for any single point on a baffle edge. Since all points along all edges have an impact, the result is a very complex pattern that combines to produce the final result at the one point in space being examined. Move that point and the result changes. Given that, we have to careful examine a limited set of points, otherwise the effort is just too time consuming. We can also make a few assumptions as to listening axis, so we end up with a more reasonable study to conduct.
The first and probably most important assumption is listening axis. Speakers may be on-axis, toed-in or toed-out. It's probably more common to be on-axis or use toe-out if the system is not placed close to a side wall. Toe-out also is usually kept to 5-10 degrees, so the assumption used here is for on-axis or slight toe-in. The On-axis to 5 degrees off-axis will show variations. Results are shown for that and more, but in practice they are close enough on the short side that we'll make another assumption. The final placement will use the on-axis response with the intent of having the system locations such that the edge closer to the drivers is towards the other box of the pair. That is, offset towards the inside. We'll see why later. Some situations exist where it's better to have the drivers to the outside, but they are limited and not of concern for this case.
Using CAD to Model the Diffraction
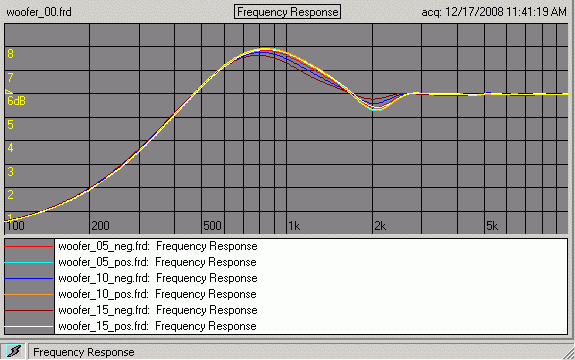
Software is becoming more widely available that can show approximate diffraction effects. Various results are shown for the selected layout. Changing the layout can have rather dramatic effects, especially for the tweeter. In general, the smaller the diaphragm, the better its dispersion, therefore there's more impact from diffraction. The tweeter should be the focal point of the study.
Most software is going to present the diffraction as a deviation from perfectly flat response. What this means is that if you have a measurement on a large, quasi-anechoic baffle (no diffraction), what you'll get when that driver is mounted on a baffle is that response modified by the diffraction. Essentially, super-impose one on the other and you can get an idea of what the result will be. At high frequencies, the result should remain flat, in the front hemisphere, what is called the 2-pi region(2-pi radians). As frequency drops, there will be "undulations" in the response. At a point referred to as baffle step, there will be a broad boost followed by a rapid drop that usually results in a 6db drop below the top level. This lower level is called the 4-pi region because the radiation is essential spherical (4-pi radians). The graphs below are for the final layout used and represent the 4-pi region as 0db and the 2-pi region as 6db.
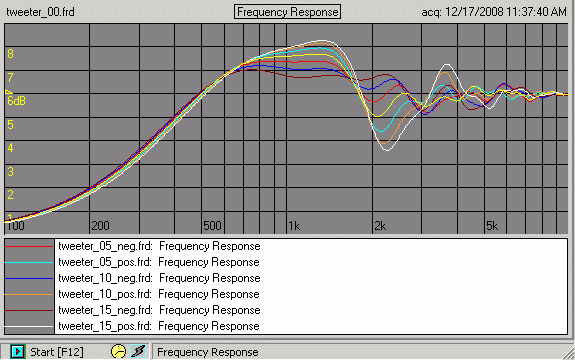
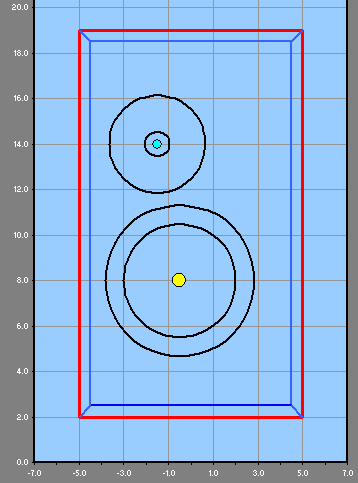
Why was this layout chosen, you might ask. It's a combination of frequency response, CTC distance and, yes, aesthetics. The tweeter frequency is the focus due to the impact of position on it. The woofer is maintained reasonably close to the tweeter, but positioned for its frequency response and to some degree the aesthetics. The woofer would have been placed even closer, but a woofer creates a source of diffraction for a tweeter, so room was left to place a nominal amount of felt in between the drivers to reduce that. Again, the key is the tweeter.
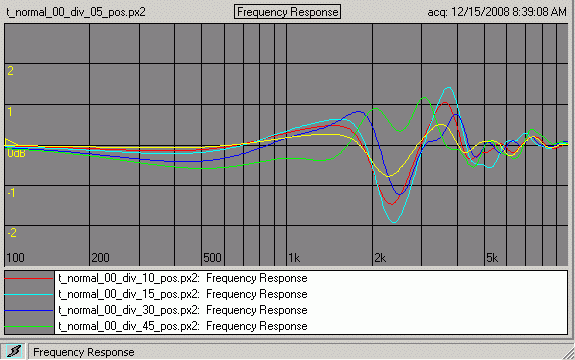
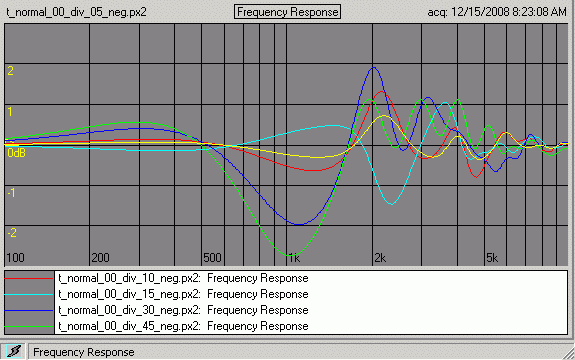
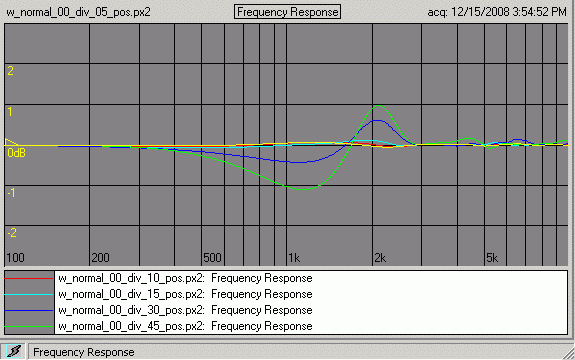
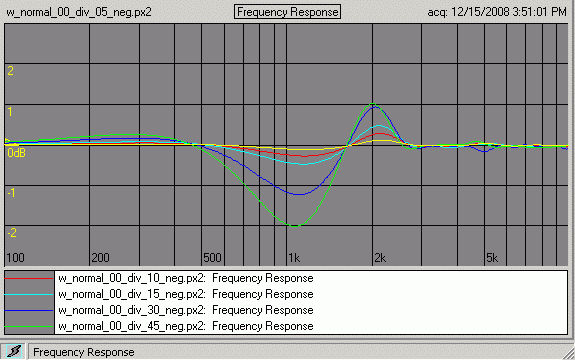
What about the vertical off-axis? The diffraction will change, but then so will the lobing due to the distance between the drivers in the crossover area. The listening axis is usual intended to be in a small area vertically with the ear kept on that axis, say the tweeter. Horizontal changes are common for box placement, but vertically there is usually little change. These are normalized to the on-axis diffraction response, showing the change in diffraction, not the absolute amount. As you can see, the change due to diffraction alone is significant, but primarily for the tweeter. The change for the woofer is small until you go beyond 15 degrees. This is not the same as "sliding" a driver up or down on the baffle, however. Note that yellow is 5 degrees in each graph and that the tweeter variation is no more than 0.5db at this angle vertically.
David L. Ralph © 2009